Entries in Tutorials (52)
Lutin hat
 Sunday, February 8, 2009 at 23:17 | by
  del4yo
 I needed a hat for my boy and couldn't bring myself to buy the usual horrid ones you find in shops. What do they have in mind when designing stuff for boys? Everything looks like created for a tiny soldier. I want a little cuteness! Anyway.
So I took some circular needles and knitted:
Mount 87 stitches. Knit 1 inch garter (1 row knit, one row purl with circular needles)
4 to 5 inches stockinette (knit knit knit no purl)
Then I continued knitting making 3 decreases by row until I could knit anymore. I finished the knit, sew the end closed, added a pompom, et voila!
Very easy project. I'm a dumb knitter.

Puisqu'on me demande ce que je tricote, et que je ne perds pas une occasion de faire mon interessante, voici le bonnet de mon fils. Franchement vu les horreurs que j'ai vu en magazin, je trouve que je m'en sort plutot pas mal. Si le patron vous interesse je peux traduire, mais ca frise le ridicule dans le genre simple, vu que je ne tricote que sous la menace. Franchement si la mode pour garçon ne ressemblait pas aussi souvent a du design pour nains para-militaires, on ne me verrait jamais avec des aiguilles :D
Digital charm patchwork
 Monday, January 19, 2009 at 21:46 | by
  del4yo
 (en Francais plus bas, ne pleure pas Jeannette, tralalalala)
OK. I'm going to share some cool little stuff with you, and I hope you will love it!
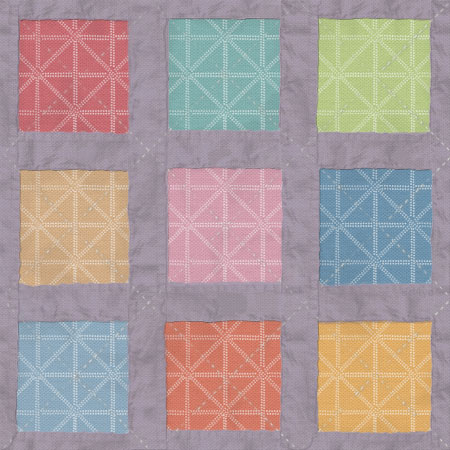
Did you notice my new patchwork background? It's fake fake fake! I wanted to make a mockup of my patterns as fabrics, to see if I would like to print them at spoonflower or what?
Anyway. I thought you might want to do the same, and test your patterns before printing. Or use it as a tool before buying fabrics, to see if you like them or not. Or create a nice backgound for your blog. Anyway. No commercial use, OK?
Here's how to do this:
Download this file : patchwork_del4yo
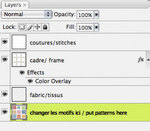 Unzip it, and open in Photoshop. In the layers palette, clic on the lower layer.
Draw, put plain colors, fill with patterns, scan drawings and put them here. Anything, have fun!
Then double-click on the "color overlay" Effects to change the color of the frame.
Can't make more fun and easy. And it will look real :)
If you want to scan fabrics/use fabric patterns, remove the "fabric/tissus" layer. It's some fabric affect I added to make any pattern look like fabric, you don't need it with fabric textures.
Enjoy...And please show me the result!
 del4yo
Bon... Y'en a qui ont de la chance parceque Clo laisse des commentaires irresistibles qui donnent envie de partager des idees. Voila. Vous avez vu le nouveau pattern de fond? Toc toc toc c'est du toc, entierement fait sur Photoshop aves mes petits doigts ( non, pas boudinés). Et je me suis dit que ca serait sympa de vous filer de quoi faire vos propres patchworks avec vos patterns a vous, ou des couleurs ou ce qui vous plaira.
De toutes les facons, et encore une fois, ceci est pour un usage non commercial, OK?
Donc pour faire ça:
Telechargez ce fichier : patchwork_del4yo
 De-zippez le (si vous ne savez pas faire, la phrase exacte a dire a votre cousine Esther la Geekette est : "J'ai un fichier zip a decompresser, je fais comment?"), et ouvrez dans Photoshop. Dans la palette des calques, selectionnez celui du bas.
Dessinez, mettez juste des couleurs, remplissez avec vos motifs a vous, brefle amusez vous! Le resultat est raccord, ca fera un vrai motif de fond (scrabooking quelqu'un?).
Vous pouvez double cliquer sur l'effet "color overlay"pour changer la couleur du tissu qui fait cadre (grand luxe je vous dis). Cliquez sur l'echantillon de couleur pour acceder a la palette.
On peut pas faire plus facile. Et le resultat aura un petit air vrai comme mon pattern a moi, tip top :)
Si vous voulez utiliser des tissus, supprimez le calque "tissus". Il y a une matiere dedans qui donne un air de textile a l'image, et tissu sur tissu ca risque de faire bizarre.
Voili voilou, amusez-vous...Et montrez-moi le resultat!
Get clean pictures!
 Friday, January 16, 2009 at 12:01 | by
  del4yo
 La version Francaise bientot!
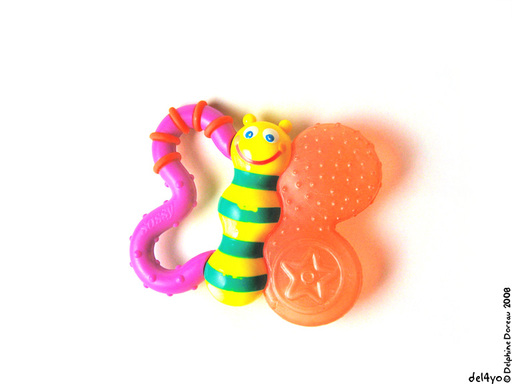
Getting clean pictures is not easy. I took that picture of my baby's favourite rattle , but it came out gray and shadowy. I wanted it sharp on a white back ground. Let's see what we can do about it.
This tutorial is for advanced Photoshop users.
Please read the Photoshop help before asking technical questions :)
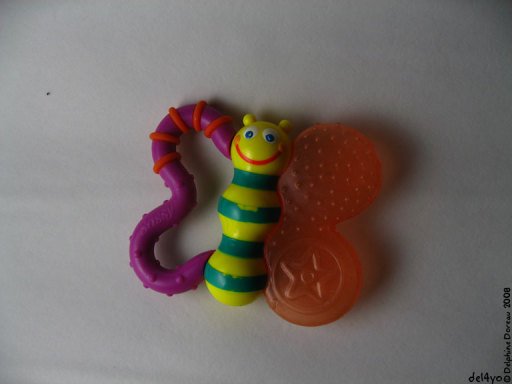
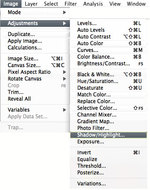 First let's learn about using the shadow/hilight tool. I love it, just plain magic.
Open it and click on the tiny box " Show more options". Moving the shadow options will make the shadows lighter, and the highlight options are to make the Highlights darker. Color correction is for overall saturation. I find it a bit touchy. I click preview on and off quite often with this tool, to check where I'm going, because it's easy to go toooooo far!
Here's what I get : so much better, in a snap!
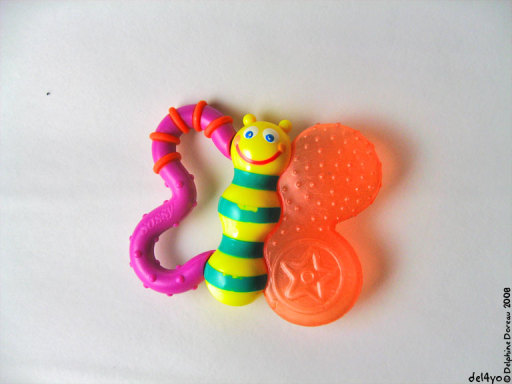
Now I will duplicate my layer and extract the background to add some zing to it. I will add a layer mask. No big deal. First select the background using the selections tools of your choice. I'm perfectly happy with the magic wand:

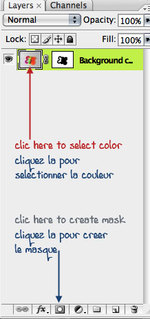
Now we want to work on the background only, so let's add a mask to that layer. Click on the layer mask Icon on the lower part of the Layers window. Done ( that was easy).
Your layer has now 2 icons, one for the color, one for the mask. Click on the color to select it.
 Now let's change that background using the level tools (images, gnaga, levels) . The window that pops up has a diagram, showing the amount of levels of black on right, white on left, and all levels of grey in between. I want all my lightest colors to be pure white, so I will move the right arrow left until the background is white except for the shadows. Bingo! I add a bit of white paint brush to erase some unwanted dust, here we go.

Now back to the underneath layer. I find it a bit dull now with those bright shadows, and I pump it up a little bit with the Selective color tool. I also now that when published it will be darker and duller. So what I do is play this tool , keeping in mind the complimentary color rules. In yellow I remove a bit of Cyan and Magenta, in reds I remove cyan, etc. Pretty!
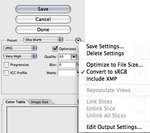
Finished! It looks a bit bright on screen but perfect for printing. Now let's save it "for web", using these options:
If you are on Windows (baah) you probably are already saving jpegs in SRGB. But not on a Mac. Using the "convert into SRGB" option will save you a lot of time and surprises. Very few printers actually know about color settings,using the basics will keep your picture safe.
Enjoy your homemade book or print!
Projet numero 1-souvenirs
 Friday, December 26, 2008 at 22:52 | by
  del4yo
 English translation in yesterday's post.
Pour le plaisir de ceux qui ne parlent pas Anglais, les liens menent vers des traductions Google de sites en Anglais, a part celui de Lulu qui existe reellement en Francais.
Chaque année, depuis la naissance de mon bébé, je lui fais un livre. Un vrai pour lui tout seul, publié de maniere professionnelle sur blurb (il ya beaucoup de sites web d'auto édition. J'aime bien blurb, mais vous préférez peut-être essayer en Francais avec Lulu ou autre chose). L'année dernière, j'ai fait quelques illos, mais cette année, c'est un tout autre projet, et j'ai pensé qu'il serait amusant de partager mon idée avec vous.
Je voulais celebrer le nouveau vocabulaire de mon mon bébé qui parle presque. Nous avons fait une liste de tout ce qu'il peut nommer. Le temps que Prezd reunisse les plus difficiles a trouver, je commencais a prendre des photos a l'aide de mon studio de macro photo Lowell Ego. C'est un truc tout fait, mais vous pouvez en construire un pour moins de 10 $ avec les instructions sur Strobist.
Nous avons pris une photo de chaque objet sur un fond blanc. Ensuite, j'ai tout nettoye sur Phostoshop pour avoir des images bien propres sur un fond blanc parfait. Je l'ai sauvegardée en jpeg, convertis en SRGB, suivant les instructions de Blurb pour trouver la bonne taille.
J'ai téléchargé le logiciel de Blurb pour editer mon livre. J'ai mis une image patiemment a la suite d'une autre dans la maquette fournie. A chaque image j'ai rajoute le nom de l'objet plus la facon dont le prononce mon fils.
J'ai tout relu pendant que mon mari ecrivait une petite intro toute douce pour la premiere page, hop j'ai renvoye a Blurb, et bingo, dans une semaine environ, nous avons un cadeau pour mon fils: un livre qu'il pourra lire tout seul!
Vous pouvez faire le même projet avec un enfant plus âgé, avec ses jouets préférés ... Ou le faire pour vous avec des objets de tous les jours. Ce sera un beau livre a relire dans une dizaine d'années. Je vais faire un tutorial, pour expliquer comment nettoyer vos propres images sur Photoshop. Vous avez juste le temps de preparer votre studio et de faire les photos!
----------PS
J'ai montre la maquette a mon fils qui n'en pouvait plus de joie. Un livre qu'il peut lire seul a haute voix! Il etait tellement ravi qu'il en a eu le hoquet. A la deuxieme lecture il a deja fait des progres et prononce beaucoup mieux (j'ai dit mieux, pas bien, du calme) certains mots comme "kokeshi" ou "helicoptere". En fait cela se revele un super outil pedagogique, je n'en demandais pas tant!
Project #1 - keepsake
 Friday, December 26, 2008 at 12:34 | by
  del4yo
 Traduction de ce post demain, promis!
Every year since my baby is born I make him a book. A real one for him only, published professionally like on Blurb (there is a lot of different self publishing web sites. I like Blurb, but maybe you'd rather try with Lulu or something else). Last year I made some illos, but this year is a whole different project, and I thought that it would be fun to share my idea with you.
I wanted to celebrate my baby's new vocabulary and speaking skills.We made a list of all the objects our baby was able to name, and gathered them. Then we used my Lowell Ego macro photo studio, but you can build one for less than 10$ with the instructions on Strobist website.
We took a picture of each object on a white background. Then I Photoshoped them to make a clean picture of each on perfect white. I saved them in jpeg, converted in SRGB, following Blurb's intructions for the right size.
I dowloaded Blurb's bookmaking software. I put patiently one picture after an other in the book, adding as a comment the name my baby gave to each object, plus the adult name, for educational purpose (haha).
I re-read it carefully while my hubbie was writing some cute things for the front page. Back to blurb, bingo, in a week or so we will have a special gift for my son : a book he will be hable to read all by himself!
You can make the same project with an older child, gathering his favourite toys...Or do it for yourself with every day objects. It will be a nice memory book in ten years or so.
I will make another tutorial in two days from now, to explain how to make your pictures cleaner on Photoshop. You have just the time necessary to prepare your studio and do the pictures!
Dot dot point point trait
 Tuesday, May 27, 2008 at 17:59 | by
  del4yo
 Someone asked for a tutorial about dotted lines. You should be able to do some using this tutorial and this other one I made about brushes, but sometimes a simple example is nice to get a good approach to a board subject.
Quelqu'un m'a demande un tuto sur les points et les traits. Vous devriez pouvoir vous debrouiller avec ce tuto-ci et puis celui-la , mais parfois expliquer un point de detail est une bonne facon d'aborder un sujet plus large, alors voici. Ce tuto est en Anglais, mais vous trouverez la traduction ICI.
- - - - - - - -
First of all. As in geometry, a Photoshop line is composed of a multitude of points. If the space between points is short or non-existent, then the line will be continuous. The first thing to do to understand this is to open the brushes window and create a brush with a spacing superior to 100% (look for: brush tip shape, spacing). See? Dots.
Then you will want some more fancy dots, maybe create a line that looks like stitches or suggest the flight of a bumblebee.
For this, you will need to draw a picture of a stitch, like this:

Or a simple rectangle, like this:

Make a rectangular selection of your point/stich/rectangle, and then do Edit>define brush preset. It works better if your point is an horizontal shape.
Then you need to open the Brushes window. Go to the "brush tip shape" tab. Select your new brush preset.
Define the spacing. Save the brush. Try the brush.
It doesn't work. It looks like this.
And you want it like that.
Go to the brushes window, click the shape dynamics tab, and choose Angle Jitter , 0%, with Control set to : Direction .
Et voila! You are now a happy bumble bee.
--------French translation.
Tout d'abord. Dans Photoshop,et comme on vous l'a appris a l'ecole en cours de geometrie, une ligne est composee d'une multitude de points. Si l'espace entre les points est trop court, ou inexistant, alors la ligne sera continue. La première chose à faire pour comprendre ceci est d'ouvrir la fenêtre des brosses et de créer un pinceau avec un espacement supérieur à 100% (dans brush tip shape, spacing)
Et alors sous vos yeux ebahis aparaissent, oh merveille:Des points.
Ensuite, vous voudrez peut-etre un peu plus de fantaisie, créer une ligne qui ressemble à des points de couture, ou qui suggerera le vol d'un
bourdon. Bzz.
Pour cela, vous commencerez par dessiner un point, comme ceci:

Ou tout simplement un rectangle

faites une selection rectangulaire et en suite faites Edit>define brush preset. Ce tuto marche mieux si vous faites une forme de brosse plutot horizontale.
Ouvrez la trousse des brosses. Allez a l'option "brush tip shape" . Selectionnez votre nouvelle forme de brosset.
Definissez l'espacement. Sauvez votre nouvelle brosse, essayez la
Ca marche super pas. Ca donne ca:
Vous ce que vous vouliez c'est ca, et en plus ca ne se fait pas de dire des gros mots sur internet, flukpe.
Retournez dans la trousse des brosses, trouvez l'option "shape dynamics" , et choisissez Angle Jitter , 0%, avec les Control definit par la : Direction .
Et voila! Maintenant c'est bon, vous pouvez etre un joyeux bourdon.
Bzzz. Il me manque des bouts de traduc', vous etes les bienvenus si vous pouvez aider!
Brosses Photoshop (3, et on arrete)
 Friday, April 11, 2008 at 13:04 | by
  del4yo
 If you want to share your Photoshop brushes:
1. Make sure they are saved in the library :
in the brush tool, right click then save. The "save" icon looks like this :
2. Then open Edit>Preset manager
3. Use the command ⌘ key, select the brushes you want to save as a set.
4. Click the "save set " button, save an .abr file
5. Upload to your favourite server. You may have to zip it.
6.Put a link on your blog, and share the fun!
Here's a set of flying piggies for you to enjoy : remember, if you manage to accomplish 6 impossible things before breakfast, pigs will fly!
This set is for personal use only, no commercial use, no redistribution, no no no. Put a link to this post if you liked them!
A l'intention des artistes cros gentils qui veulent partager leurs nouvelles brosses, voici comment faire, avec mes excuses, je n'ai pas Photoshop en Français. Cliquez ici pour la traduction!
1.Syez deja surs d'avoir sauve vos brosses dans la librairie de brosses :
L'outil brosse activé, click droit et clic sur l'icone de sauvegarde. L'icone "sauver" (ou est-ce enregistrer?) est comme ca :
2. Ouvrir Edit>Preset manager
 (click click pour une grosse image)
3. En utilisant la touche ⌘ pour en selectionner plusieurs, selectionnez les brosses dont vous voulez exporter un set.
4. Appuyez sur "save set " , sauvez en format an .abr (c'est automatique)
5.Telechargez sur votre serveur favori. Il ets peut-etre necessaire de compresser en .zip. Demandez a votre geek favoru comemnt faire ( pas moi)
6.Mettez un lien sur votre blog, et partagez avec les copains!
Voici un set de brosses special pour la Trollette (l'espacement c'est dans le premier menu, avec la taille dans la trousse brosse}, mais ca ne vous empeche pas de l'utiliser aussi.
Pas d'utilisation commerciale, merci merci, pas de redistribution tout ca, et si vous les utilisez dans un photopaint n'oubliez pas de mettre un pti lien...


