voir l'intérieur


Follow Me on Pinterest


Spilt Milk 

(mon blog photo)

pancartes Portfolio Tutorials papertoys Magic Sketchbook Free stuff Motifs de t'a moi Oizos! lapin!

Archives

Entries in crafty (49)

Wednesday
Feb052014

Petits coups de coeur

Two discoveries today : a good book to create cute illustrations with washi tape,イラストでアレンジ! マスキングテープの使い方 (Illustrations with Washi Tape) by par Shirada Hiromi and the ultimate pen to draw on washi  Zebra Onamae Name Marker . I have been searching for a pen like this for years and I am quite happy!


Je bosse dur sur un prochain livre, mais je m'offre parfois une petite récré à l'heure du thé, avec une de ces livres Japonais dont je raffole. Mon préféré en ce moment,イラストでアレンジ! マスキングテープの使い方 (Illustration avec du Washi Tape) écrit par Shirada Hiromi, est une vraie mine d'idées pour l'illustrateur dilettante. Je m'amuse beaucoup à le suivre, carnet et washi à la main.

Je digresse évidement, mais pour une fois pas tant que ça  parce que le style est assez proche du mien.


Quoique les lapins, là, c'était pas dans le bouquin

Mais je digresse! Le livre donne quelques idées de stylos à utiliser...He oui, les washi addicts dans la salle , et les chouette kiteuses en plus, confirmeront : le washi tape a une jolie surface lisse, mais c'est impossible de dessiner dessus. J'ai trouvé des stylos qui dessinent sur le papier mais pas sur le washi tape, des stylos qui dessinent sur le washi mais bavent sur le papier...Le livre donne quelques pistes mais évidement pas moyen de trouver les stylos correspondants...Mais j'ai suivi la piste...et j'ai trouvé un stylo chez Zebra, le Zebra Onamae Name Marker, qui marche sur le papier ET sur le washi, oh joie, d'un beau noir brillant qui ne bave pas. On peut le trouver en ligne, mais si vous n'avez pas de vendeur de zèbre près de chez vous, essayez des feutres faits pour le tissus si vous en avez sous la main, peut-être que ca marchera?


Friday
Jan242014

What's up?

What's up darling?

There has been a little painting in the studio today. Little Bu is sick at home , I had to work on my next book (hurray!). Lucky us it's about toy making. I needed some wooden toys to go with the toys I am building. I found some, but not much. I wouldn't have bet that finding a cute toy astronaut or knight would be so difficult. Cute is expensive and I don't do ugly.
So I bought some blank peg dolls and we had fun with Monsieur Bu.

I also asked for help and called my favorite Giraffe . She took some of her very precious time and made me a big, chic, huggable, cheerful doll. I'll show you soon.

These days my studio looks like a giant toy bazaar...I'll show you when I'm done, in the meantime Monsieur Bu finds I have indeed a very cool job.


L'atelier a des airs de magazin de jouets ces jours, je travaille sur mon prochain livre qui sera plus DIY. Il me manquait des petits joujoux pour certaines scènes du livre, et si j'ai pu en trouver quelques-uns ( je voulais de jolis matériaux) , j'ai été bien rebutée par le prix des joujoux en bois...En conclusion, si c'est pas cher c'est moche et si c'est joli ça coûte un bras ( d'ou les kokeshi. Pas de chocolat. etc) 

Le Bu est malade ces jours, un petit microbe pas plaisant ( une grosse angine, on  beau être vaccinés contre la grippe, il y a d'autres trucs pas jolis jolis) , donc il traîne dans l'atelier...On a un marché très clair, il n'a pas le droit de jouer avec ce que je construis avant que j'aie pris les photos. C'est très dur d'attendre parfois, aussi il était très heureux de m'aider à peindre mes soldats et autres astronautes. On a fini par en faire deux fois plus que prévu, Monsieur Bu ayant des idées à tire-larigot.

Il retourne en classe lundi après une petite semaine avec moi, et je vais avoir du mal à lâcher mon bon copain d'atelier, avec qui peindre est vachement plus sympa que la radio.


Monday
Dec232013

Gift tags 

Hi! I am a bit late with packing :you can't show off too much with a little one who still believes Saint Nick and Rudolf are coming to our house! 

I created some gift tags, here to share with you, I hope you will need to print a lot!

Happy holidays!


Mon fils étant terrorisé, petit, à l'idée d'un barbu inconnu passant par la cheminé, c'est Rudolf ( le cerf au nez rouge) qui livre les cadeaux à la maison. Ici il y a beaucoup de cerfs hémiones et nous  en croisons régulièrement : il croit encore que Rudolf existe. Donc je dois me cacher et je suis un peu en retard pour emballer les cadeaux...Vous aussi? Imprimez donc mes etiquettes!


Saturday
Nov302013

Advent calendar 2013

I feel lazy this year, and wanted a very simple advent calendar.

I inspired myself from, yes, my very own book and created a simple paper chain. Isn't it fun?

Fold, cut, hide little gifts or fairy lights behind the windows. Done

You can make it in 5 minutes and go for hot cocoa. 

I might improve it a bit and create a background. Not sure. What do you think?


You can download the pdf here, and I put a video at the end of the post to show you how fast it goes!

I stopped at the 24. I need to do something special for the 25. Not sure what. I need to think about it!

 CLICK ON THE PICTURE TO DOWNLOAD

Moi, cette année, je n'ai le temps de rien, mais je veux tout quand meme! Je me suis inspirée de ha ben oui, mon propre livre :

Pour faire le calendrier de l'Avent le plus simple ( et le plus joli, allez) du monde.On plie, on coupe, c'est fini. 12 minutes pour tout faire. Plus facile... ça va être difficile. 

On met la ribambelle sur un meuble avec des cadeaux ou une guirlande de lumière derriere.
Je me demande si je ne vais pas ajouter un petit fond derriere les fenêtres, j'hésite, à votre avis?  En tous cas, il ne va que jusqu'au 24, pour le 25 il faut que je réfléchisse...

Ribambelle tutorial from delphine doreau on Vimeo.

Monday
Jul012013

Un mot de billet

Click, print, cutout and use for your next note...stick it on the fridge with washi tape!
Isn't it more pretty than a Post-it?

Non-commercial use only!


Un pti mot à laisser? Allez, aujourd'hui on abandonne les post-it, on imprime mon joli mot et on le colle avec du masking tape sur le frigo ou sur la porte!


Pas d'usage commercial merci. Usage personnel seulement.

Friday
Jun282013

6 livres pour apprendre à dessiner en s'amusant

Here is a review about my favorite doodle books. I am afraid it's in French. But the books are international so please check them. I listed the ISBN and links lower in this post.

Revue : mes livres de dessin préférés from delphine doreau on Vimeo.


Les livres cités:

20 Ways to Draw a Tree and 44 Other Nifty Things from Nature, by Eloise Renouf
ISBN: 9781592538379,

20 Ways to Draw a Cat and 44 Other Awesome Animals, by Julia Kuo
ISBN: 9781592538386 , publisher : Quarry

-------

Illustration School: Let's Draw Plants and Small Creatures, by Sachiko Umoto
ISBN: 9781592536474 , publisher : Quarry Books

Les autres livres par Sachiko Umoto, ici

-------

Illustration au stylo à Bille, par Yoko Ganaha, titre Japonais : ボールペンでイラスト―ちいさなお絵描きレッスン帖 [単行本]  
ISBN-13: 978-4870319202

Et son autre livre, Croquis au Stylo à Bille ,  ボールペンでスケッチ [単行本(ソフトカバー)]
ISBN-13: 978-4870319844

-------

Au début de la video je parle d'Ed Emberley. Il a dessiné plusieurs méthodes de dessin très chouettes, dont "How to draw a world", qui s'adresse plus aux enfants.

Tous ces livres sont très clairs, sans texte ou avec très peu de texte, le language dans lequel ils sont publiés importe finalement très peu.

Thursday
Jun272013

Pompom Mania

I bought a Japanese Book about Pompoms a while ago ( ISBN 978-4-7661-2282-4 , find a lovely  article  here on Zakka Life about it) ...I was already admiring the whimsical ones my friend Christelle does and, indeed there was a little of pompom making in the studio these past months!

Inspirée par Christelle, de Tambouille, je me suis découvert un penchant marqué pour les pompons...ça a un petit gout d'enfance, et même si c'est killer pour le ventilo de mon ordi, je ne peux pas résister. Je me suis offert un livre de craft  japonais absolument délicieux :  Easy Pretty POM POM - Japanese Craft Book (ISBN 978-4-7661-2282-4) et depuis des que j'ai cinq minutes et un sac d'aspirateur, hop, pompon.


This little bunny was a four-hand project.

I have a self explanatory board on Pinterest : Afternoons with my son. Here I put all the crafts and fun things I would happily do with him. My son doesn't wait to be bored and instead asks for the "Afternoon board". We pick something together, make a to do list (hidden spelling , writing and reading exercise. I feel devilish), hunt what we need in the house and craft. We have loads of fun.
This bunny is inspired from a Martha Stewart's one, but instead of gluing things I sew them as much as possible, because I believe in craft that last. We had a lot of fun, totally recommend.


J'ai un board spécial sur Pinterest: Afternoons with my son, ou j'épingle tous les projets que je voudrais faire avec le Bu. Hier il a choisi le lapin en Pompon de Martha Stewart qui ressemble beaucoup à un cochon d'Inde que ma maman nous a fait, petits...


These delightful pompoms I made from the Easy Pretty POM POM - Japanese Craft Book ( find it at my favorite ebay-shop : Pomadour24, totally recommend) and I find them so absolutely pretty that I procrastinated for months to do what I wanted with them, namely hook them on my handbag. Isn't it cool? My absolutely plain $30 Old Navy handbag looks as fab as an Anthro bag, for $2 of wool and 10 cents of pretty Japanese safety pin.

I am a bit over excited about this. Wouldn't you?


J'ai donc fait quelques pompons du livre Japonais, qui traite le pompon avec un système de projection assez proche des textures 3D...Ha mais ne vous marrez pas,je suis une spécialiste du poil 3D , c'est un métier. Bref j'étais tellement contente des mes pompons qu'il m'a fallu un temps fou pour les utiliser comme je voulais, pour transformer un sac un peu blah en sac chic. J'aurais du le faire plus tôt, c'est carrément la mode ici... Est-ce que c'est la mode en France aussi? 


The cute effects on the photos were made with the iPhone App A Beautiful Mess

Sunday
Jun162013

Shrink paper how to

Getting it right with shrink paper is not that easy!

I had this idea in mind of cute shrink paper jewelry. Getting the process just right for wearable art was much more work than expected. I am actually still testing products and ideas.

I tested 3 kinds of paper from Grafix. The printable one would never flatten back after curling in the oven : maybe I got a lemon, but it's too expensive to make more tests. The translucent one did well but the result is not to my taste . The white one was exactly what I wanted but was very difficult to glaze or varnish.

I drew with classic Sharpies on the white grafix shrink paper, but Sharpie ink is NOT permanent on shrink paper. It looks ok. But after a while it melts on the skin or rubs off. It's  difficult to glaze because it is soluble with alcohol, acetone, and water. Most varnish have that kind of solvent. 

So I enquired around, with friend from many horizons, the stylists, the artists, the educators, the art store sales persons and the movie makers!

I ended up with a few solutions.


1.I you want a beautiful finish with an illustration like feel:

First sand your white shrink paper with a 400 grit sand paper to give it some tooth. There will be dust. Don't do this near any computer or electronic device.
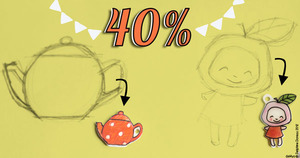
Draw with colored pencils ( Prismacolor work beautifully). Keep in mind that your drawing will shrink to 40% of its size or more so your colors will be 2.5 more concentrated, at minimum. Browns will be black, reds will be intense, etc. Cut out, don't forget to punch holes.  Shrink according to instructions.Then glaze or varnish with either Sculpey gloss for a shiny result or some artist acrylic medium ( the paste kind sold in tubes) for a more matte finish. 


I first sketched my drawings on paper then put the paper over it to copy. It's thin enough before shrinking that you can see through .

2.If you want a black outline and maybe some fun neon accents.

Don't use classic Sharpies, especially the black ones. If you still do, the only glazes I found that worked were white glue (it won't dry properly) and artist acrylic medium. Thing is, the acrylic medium doesn't dry pretty like a glaze and I find it frustrating. It's not a professional result. I tried to glaze over medium with Sculpey gloss but it's not perfect.

I tried oil paint based Sharpies with sanded paper. Not a good idea. The ink feathered. Yuck!

I tried the same oil markers on un-sanded paper, it worked! I added a few classic Sharpie neon accents because I noted they were doing better with glaze ( better, not perfect). I was afraid, since it's oil based, that it wouldn't cook very well, but it did OK. I can't vouch for fumes though. Maybe it's toxic, but with the very little amount of ink I used I thought it might be ok. The oil based Sharpie is not melting with glaze or acrylic medium, and if not glazed doesn't rub off as fast as the classic sharpie.

So : Draw on unsanded shrink paper with oil paint based Sharpies  , cut out , don't forget to punch holes, shrink according to instructions, glaze or not ( it might rub off if you don't. It might dilute if you do).

So in conclusion 

There is only two combos that I really liked:

1.Sanded paper, Prismacolor, acrylic medium ( you can try some matte finish too) : it gives a nice "out of the book" illustration look. 

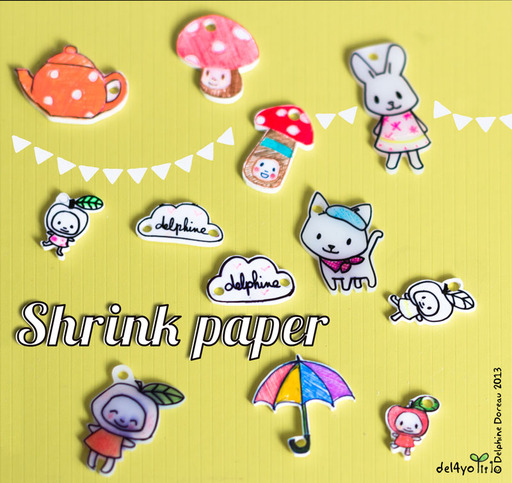
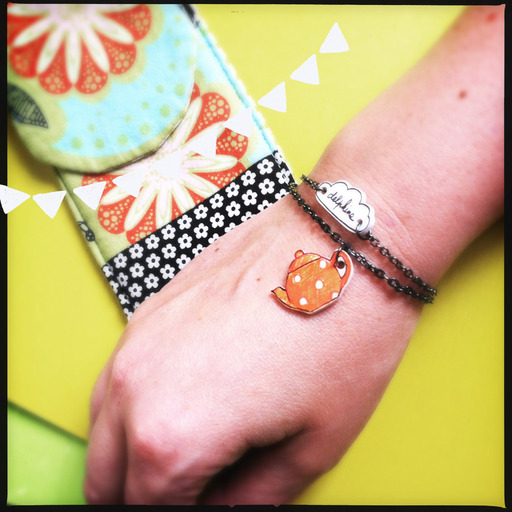
It's the one on the teapot.


2.Oil based sharpie permanent marker, sculpey glaze. It gives a fun shiny ceramic look.

it's the one on the cloud


That's it! I tried dozens of  tools and finishes and had a lot of fail. But the good results are really pretty.


Please use my tutorial but not my illustrations if you want to sell and make your own jewelry. Make your own tests before giving or selling as I can't vouch for  constant results.