Get clean pictures!
 Friday, January 16, 2009 at 12:01 | by
  del4yo
 La version Francaise bientot!
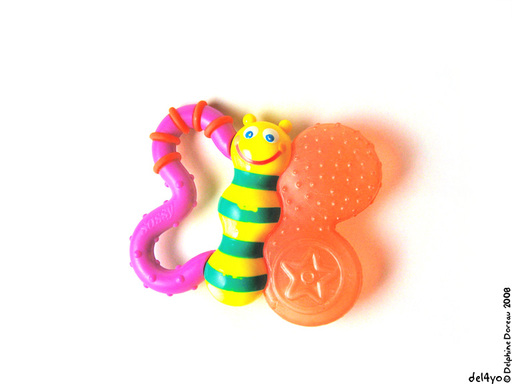
Getting clean pictures is not easy. I took that picture of my baby's favourite rattle , but it came out gray and shadowy. I wanted it sharp on a white back ground. Let's see what we can do about it.
This tutorial is for advanced Photoshop users.
Please read the Photoshop help before asking technical questions :)
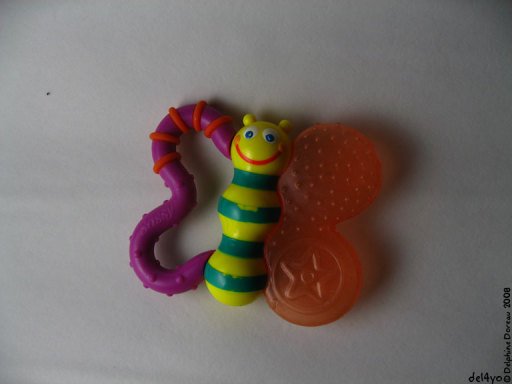
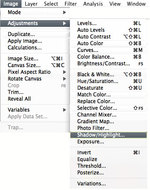 First let's learn about using the shadow/hilight tool. I love it, just plain magic.
Open it and click on the tiny box " Show more options". Moving the shadow options will make the shadows lighter, and the highlight options are to make the Highlights darker. Color correction is for overall saturation. I find it a bit touchy. I click preview on and off quite often with this tool, to check where I'm going, because it's easy to go toooooo far!
Here's what I get : so much better, in a snap!
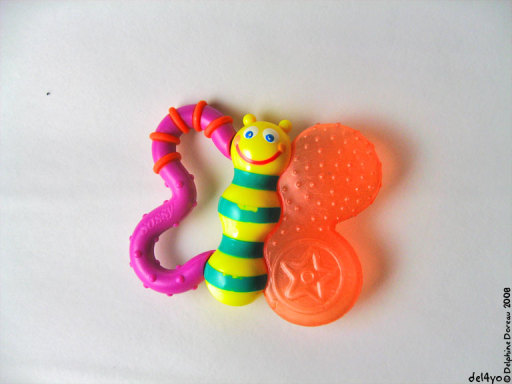
Now I will duplicate my layer and extract the background to add some zing to it. I will add a layer mask. No big deal. First select the background using the selections tools of your choice. I'm perfectly happy with the magic wand:

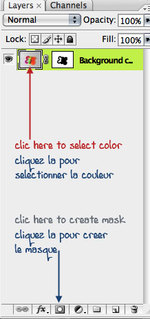
Now we want to work on the background only, so let's add a mask to that layer. Click on the layer mask Icon on the lower part of the Layers window. Done ( that was easy).
Your layer has now 2 icons, one for the color, one for the mask. Click on the color to select it.
 Now let's change that background using the level tools (images, gnaga, levels) . The window that pops up has a diagram, showing the amount of levels of black on right, white on left, and all levels of grey in between. I want all my lightest colors to be pure white, so I will move the right arrow left until the background is white except for the shadows. Bingo! I add a bit of white paint brush to erase some unwanted dust, here we go.

Now back to the underneath layer. I find it a bit dull now with those bright shadows, and I pump it up a little bit with the Selective color tool. I also now that when published it will be darker and duller. So what I do is play this tool , keeping in mind the complimentary color rules. In yellow I remove a bit of Cyan and Magenta, in reds I remove cyan, etc. Pretty!
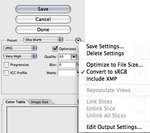
Finished! It looks a bit bright on screen but perfect for printing. Now let's save it "for web", using these options:
If you are on Windows (baah) you probably are already saving jpegs in SRGB. But not on a Mac. Using the "convert into SRGB" option will save you a lot of time and surprises. Very few printers actually know about color settings,using the basics will keep your picture safe.
Enjoy your homemade book or print!










Reader Comments (6)
superbe !!
je me lancerai demain dans l'essai... et si ça ne marche pas, j'attendrai la traduction ! parce que c'est pour les advanced photoshop users, certes, mais quid des nuls-en-anglais-users???
en tout cas, merci ! l'idée du livre pour mon titi me trotte dans la tete depuis ton post !
>>Ok je m'y mets des que j'ai 5mn ( ca va pas etre facile ca) :)
Hi, Delphine! Last August, you shared a drawing of clothes on a clothesline on your old blog and said it was for kids to color. I thought it would make a nice embroidery pattern. I finally finished stitching it the other night and I used a picture of my embroidery for my blog header. I hope that's ok with you. (Please let me know if it's not ok and I will remove it.) I'm going to post a link to your drawing on my blog and a link to your new blog too so everyone will know where I found it. Thank you for sharing your work with those of us who cannot draw or paint at all! :)
>>An embroidery? How sweet :) I saw it, I love it! It would be nice that you put somewhereon your website that the embroidery was done from my design, and that your icon is one of my designs too. You should add a copyright underneath your picture too : ©Patty and del4yo 2009
Have a nice day!
huhuhuhuh, le menu gnagna :)
Super tuto madame lapins, comme d'habitude !
>>Hihi et puis il ya aussi le menu "pff ou il est ce filtre" et mon prefere : "hanon c'est pas windows c'est ou deja"
Merci pour ce tutorial très clair! Je vais tenter l'expérience le plus tôt possible..je trouve le résultat très réussi et c'est vraiment idéal pour mettre des objets en valeur..
Merci! Merci! ;)
wow - too simple! Thanks for sharing this... I will definitely be using this!
Je ne maitrise pas tout bien, mais cette semaine, j'ai bien progressé grâce à ton tuto! Comme ça j'affiche des images plus propres sur mon blog.
Merci Del !